Making an Alien Chaos Manifestation
Once again, while messing around on The Miniatures Page, I stumbled over a link to an article on the Terragenesis site. This time, the discussion was about making "Alien"- looking buildings out of partially melted plastic drink containers. Unfortunately, I can't find the original link any longer, but I would recommend having a look at the Terragenesis site anyway.
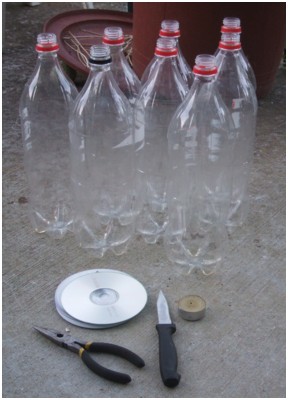 Certain members of our household enjoy drinking a carbonated drink produced by a large, multi-national company. It took me less time than I expected to accumulate sufficient empty bottles to begin my project. And as I work for a media company that uses and disposes of dozens of CDs each week, collecting half a dozen or so pre-loved CDs for bases was simple as well. The knife was used to cut the bottles up while the pliers would allow me to hold the plastic bottle pieces while I applied heat to them. I assumed, on the basis of my experiments melting drinking straws to make alien plants, that I would only require a tea-light candle as a heat source. In this instance, I was badly wrong.
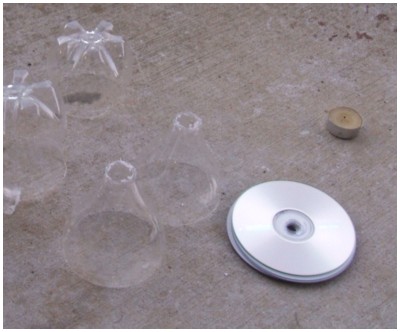 To begin, I cut the cap threads off my bottles, and then cut the bottles into three pieces - effectively just on the upper and lower label edge line. The middle section went in the recycle bin. It was here that I discovered how strong these plastic bottles really are. The plastic cap threads, in particular, are made of very thick plastic and I could only cut them off with a saw - my knife was just not sharp enough.
With the bottles sectioned, I fired up the tea-light candle, seized a piece of bottle with my pliers, and discovered my next problem. The candle would not throw enough heat to warp the plastic before either the wind blew the candle out, or I shifted my position and had to reheat the plastic again. Luckily, I had a long-nosed barbeque lighter handy and this proved both superior to the candle in the amount of heat generated and easier and more comfortable to use than a cigarette lighter.
 One thing I noticed was that the plastic tended to draw in on itself under heating. And while this could produce some interesting effects, often the base of the bottle section would scrunch up, making the piece unstable.
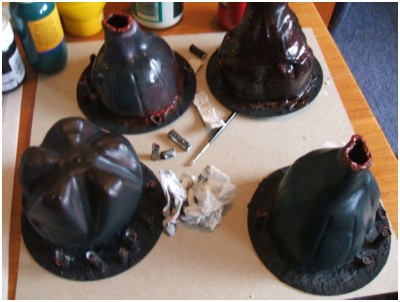
Under the gentle prodding of my wife I glued one bottle top section to a base first, using PVA glue, and when it was dry, heated it with both the barbeque lighter and the heat gun. The glue held, much to my delight, and the plastic was forced to warp elsewhere.
When I was satisfied with the warping and burn-throughs I had managed to create, I glued the remaining bottle pieces to the CD bases and textured the exposed CD surface with polyfilla. I was able to fill up the worst of the gaps produced by the warping of the base edges of the bottle pieces at this point, as well.
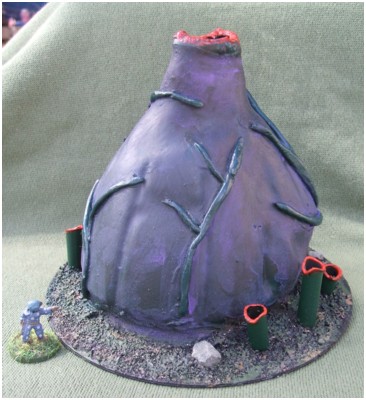
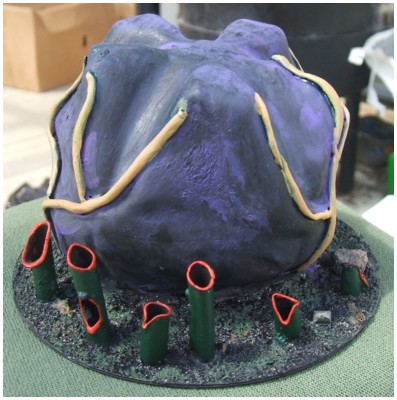
 I then undercoated everything in black poster paint and started to work on colouring the "houses" with various colour washes. It struck me that the surfaces of the "houses" were too flat. After a little thought, I began making long rolls, or ribs, out of Das modeling clay. Making a track up the "building" with PVA glue, I then afixed the Das ribs to the glue track.
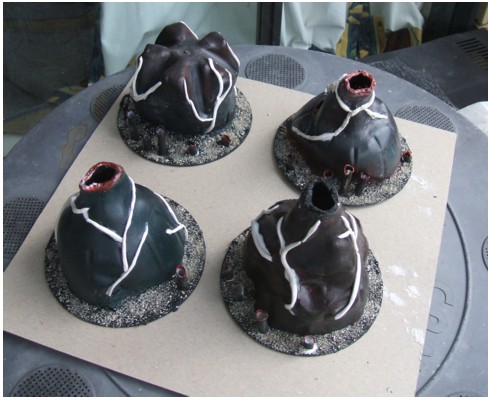
While these were drying, I textured the CD bases with a PVA/water wash and a sprinkle of sand. I also added some drinking straw pitcher plants - these could be spiracles for underground chambers/egg pits.
Painting continued as I tried to find a colour scheme I liked. I was working with a limited pallet of poster paints and so tried a series of washes of dark green and red over a black base. I eventually added a lilac wash as well. This was accidently resurrected from a poorly cleaned paint tray when water was added.
Once the basic colour scheme was completed, I touched out the mouths of the mature 'pod houses' with red poster paint and
|
|
then some GW Red Gore. The pitcher plants were painted GW Dark Angels Green with GW Red Gore lips. The ribs of the mature 'pod houses' ended up being painted in dark green poster paint, while the ribs of the immature 'pod house' were painted a mixture of Vallejo 951 White and GW Sunburst Yellow. The sand on the CD bases was undercoated black, then dry brushed a mix of GW Graveyard Earth, Tamiya XF-67 NATO Green, and some of the left-over Vallejo/GW mix I used on the ribs of the immature 'pod house'. I also stuck a couple of small stones from the gravel path across from our house on the bases to add a little extra texture.